

GWT RPC の作成例(1) 国名の取得
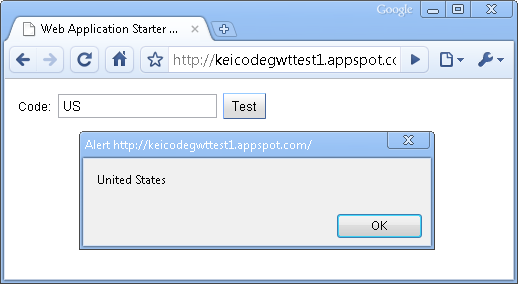
ここでは下のスクリーンショットのように、国コードを入力して、その国コードに対応する国名を返すサービスを作成し、 それを GWT RPC としてクライアントから呼出してみましょう。
実装の概要については、GWT RPC を参照してください。
サービスインターフェイスの定義
はじめに作成するのは、サービスのインターフェイスです。 サービスインターフェイスは com.google.gwt.user.client.rpc.RemoteService から派生します。
この名前は RpcTestService という名前としました。URL の指定もサービス名を小文字で書き下した "rpctest" としましょう。
package com.keicode.gwt.test1.client;

import com.google.gwt.user.client.rpc.RemoteService;
import com.google.gwt.user.client.rpc.RemoteServiceRelativePath;

@RemoteServiceRelativePath("rpctest")
public interface RpcTestService extends RemoteService {

     String getCountryName(String code);

}
Eclipse ではこれを作成したときに、対になる RpcTestServiceAsync が存在しない旨がワーニングとして表示されます。
非同期呼び出しインターフェイスの定義
非同期呼び出し用のインターフェイスは次のように定義します。
package com.keicode.gwt.test1.client;

import com.google.gwt.user.client.rpc.AsyncCallback;

public interface RpcTestServiceAsync {

     void getCountryName( String code, AsyncCallback<String> callback );

}
名前が元のサービスインターフェイス + "Async" であること、 およびメソッド名とそのパラメータに注意してください。
サービスの実装
サービスの実装は server パッケージに入れます。
名前は インターフェイス名 + "Impl" とします。
package com.keicode.gwt.test1.server;

import com.google.gwt.user.server.rpc.RemoteServiceServlet;
import com.keicode.gwt.test1.client.RpcTestService;

@SuppressWarnings("serial")
public class RpcTestServiceImpl extends RemoteServiceServlet implements RpcTestService {

     public String getCountryName( String code ) {

          if( code.equalsIgnoreCase("JP") ){
               return "Japan";
          }
          else if( code.equalsIgnoreCase("US") ) {
               return "United States";
          }

          return "Unknown";

     }

}
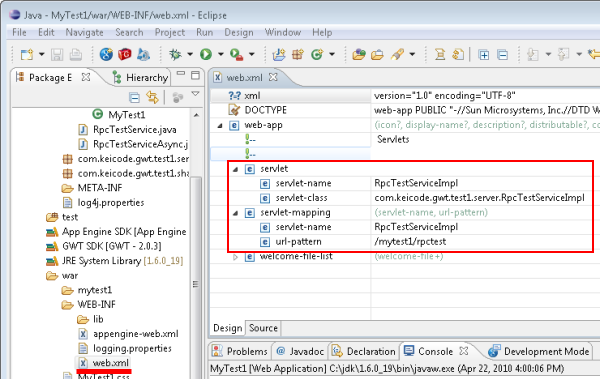
サーブレットの設定
Web Application プロジェクト名とサービス・インターフェイスの @RemoteServiceRelativePath で指定したパスを元に、 Servlet の URL パターンが決まります。
ここでは MyTest1 プロジェクト内の "rpctest" ですから、Servlet の URL パターンは /mytest1/rpctest になります。
サーバー側の実装は以上です。これを呼出すクライアント UI を作成しましょう。
ホストページの作成
国コードを入力するテキストボックスとボタンを配置します。 そのために、テーブルに id を指定した div を二つ配置しました。
<!doctype html>
<html>
   <head>
     <meta http-equiv="content-type" content="text/html; charset=UTF-8">
     <link type="text/css" rel="stylesheet" href="MyTest1.css">
     <title>Web Application Starter Project</title>
     <script type="text/javascript"
          language="javascript" src="mytest1/mytest1.nocache.js"></script>
   </head>
   <body>
     <iframe src="javascript:''"
          id="__gwt_historyFrame" tabIndex='-1'
          style="position:absolute;width:0;height:0;border:0"></iframe>
     <table style="margin:10px;">
     <tr>
          <td>Code:</td>
          <td><div id="code"></div></td>
          <td><div id="btn"></div></td>
     </tr>
     </table>
   </body>
</html>
上記で指定した div に対して、テキストボックスとボタンを指定することで、UI が出来上がります。
クライアントコードの作成
ボタンのハンドラを以下のように実装することによって、RPC 呼び出しを行います。
package com.keicode.gwt.test1.client;

import com.google.gwt.core.client.EntryPoint;
import com.google.gwt.core.client.GWT;
import com.google.gwt.event.dom.client.ClickEvent;
import com.google.gwt.event.dom.client.ClickHandler;
import com.google.gwt.user.client.Window;
import com.google.gwt.user.client.rpc.AsyncCallback;
import com.google.gwt.user.client.ui.Button;
import com.google.gwt.user.client.ui.RootPanel;
import com.google.gwt.user.client.ui.TextBox;

public class MyTest1 implements EntryPoint {

     final Button button = new Button( "Test" );
     final TextBox codeTextBox = new TextBox();

     private final RpcTestServiceAsync svc
          = GWT.create( RpcTestService.class );

     public void onModuleLoad() {

          button.addClickHandler( new ClickHandler() {
               public void onClick(ClickEvent e){
                    svc.getCountryName(
                              codeTextBox.getText(),
                              new AsyncCallback<String>() {
                                   public void onFailure(Throwable caught) {
                                        Window.alert("Error!!");
                                   }

                                   public void onSuccess(String result) {
                                        Window.alert(result);
                                   }
                              }
                         );
               }
          });

          RootPanel.get("code").add( codeTextBox );
          RootPanel.get("btn").add( button );
     }
}
実行例
それでは試してみましょう。
確かに "US" というコードに対して、"United States" という文字が返されました。
試しに不正な国コード "XYZ" を入力してみます。
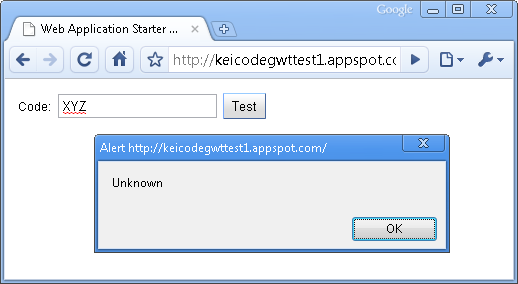
確かに Unknown という文字が返りました。